Writing Your First Widget
Assuming you have Fabric installed, it’s time to write your first widget!
The Basics
Here’s an example of using Fabric to define a simple widget - you don’t have to understand every line yet, since this guide will walk you through it.
import fabric # importing the base packagefrom fabric import Applicationfrom fabric.widgets.label import Label # gets the Label classfrom fabric.widgets.window import Window # grabs the Window class from Fabric
window = Window( # creates a new instance of the Window class and assign it to the `window` variable  child = Label("Hello, World"), # creates a new Label instance with the content being "Hello, World" and assigns it as a child of the window  all_visible=True # to make the window and all of its children appear once the config runs)
app = Application("default", window) # define a new config named "default" which holds `window`app.run() # run the event loop (run the config)
Run the code using python path/to/your/file.py
if everything goes fine, you should see a regular window that looks like this:
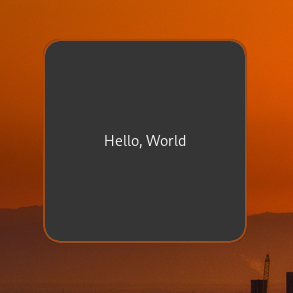
This code first imports Fabric and the widgets we need to use — a Window and a Label. It creates a new instance of each widget, with the Label being initialized with the text “Hello, World”. It then adds the label widget to the window, shows the window and all of its children, and starts fabric so the window is rendered.
“Now what?” Now, we do some real stuff!
Level 1: Boxes
Now let’s demonstrate some boxes with some labels.
import fabric # importing the base packagefrom fabric import Application # prepare the application class which manages multi-config setupsfrom fabric.widgets.box import Box # gets the Box classfrom fabric.widgets.label import Label # gets the Label classfrom fabric.widgets.window import Window # grabs the Window class from Fabric
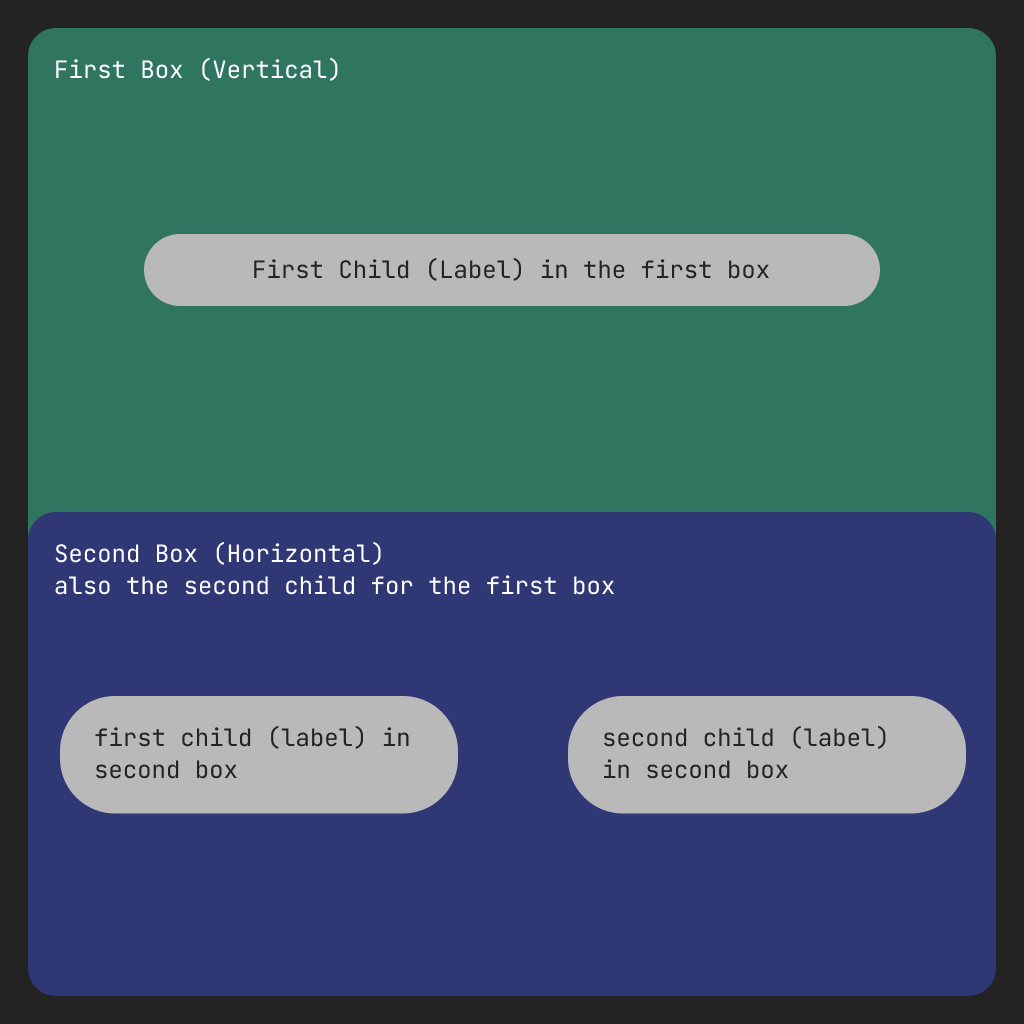
if __name__ == "__main__": box_1 = Box( orientation="v", # vertical children=Label(label="this is the first box") ) box_2 = Box( spacing=28, # adds some spacing between the children orientation="h", # horizontal children=[ Label(label="this is the first element in the second box"), Label(label="btw, this box elements will get added horizontally") ] ) box_1.add(box_2) # append box_2 inside box_1 along with the label already in there
window = Window(child=box_1) # there's no need showing this window using `show_all()`; it'll show them itself because the children are already passed app = Application("default", window) # define a new config named "default" which holds `window`
app.run() # run the event loop (run the config)Result (notice the alignment of the labels):

Here’s a visual representation for more clarity:
You probably now have an understanding of how box containers can work with different orientations. Let’s keep going.
Level 2: Buttons
First, here’s the code:
import fabricfrom fabric import Applicationfrom fabric.widgets.box import Boxfrom fabric.widgets.label import Labelfrom fabric.widgets.button import Buttonfrom fabric.widgets.window import Window
def create_button(): # define a "factory function"    return Button(label="Click Me", on_clicked=lambda b, *_: b.set_label("you clicked me"))

if __name__ == "__main__":    box = Box(      orientation="v",      children=[        Label(label="Fabric Buttons Demo"),        Box(          orientation="h",          children=[            create_button(),            create_button(),            create_button(),            create_button(),          ],        ),      ],    )    window = Window(child=box)    app = Application("default", window)
    app.run()
Result:
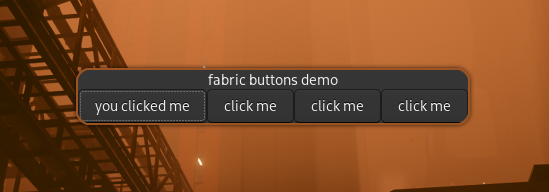
This demo creates a window with a box inside of it with the orientation set to vertical (for now, let’s call it the first box). The first child inside that box is a label with the text “fabric buttons demo”, and the second child inside the first box is another box. Let’s call this the second box. This second box has 4 buttons, with each button created by a function that handles creating and connecting them. Since individual instances of widgets can’t be children of other widgets twice, the create_button function creates completely new instances of Fabric buttons. These buttons’ button-press-event signals are then connected to an anonymous function that changes the label to “you clicked me” when they are pressed by the user.
Level 3: Simple Bar
Now that you are familiar with using buttons and boxes, we will apply these concepts to create a basic status bar.
Importing Additional Widgets
Let’s begin by importing some additional widgets:
...from fabric.widgets.datetime import DateTimefrom fabric.widgets.centerbox import CenterBoxfrom fabric.widgets.wayland import WaylandWindow as Window # Replace the previous Window import with this...from fabric.widgets.datetime import DateTimefrom fabric.widgets.centerbox import CenterBoxfrom fabric.widgets.x11 import X11Window as Window # Replace the previous Window import with thisYou might be wondering why we specifically use the WaylandWindow or X11Window classes. This distinction becomes clearer when you understand the differences between regular windows and layer windows:
-
Regular
Window: This is a typical window that can be moved, closed, minimized, or maximized by your window manager. Regular windows are more suited for desktop applications rather than desktop widgets. -
Layer Window (
WaylandWindowandX11Window): This transforms a standard application window into a desktop widget. Each display protocol has its own specific window type:X11Windowfor X11/XOrg andWaylandWindowfor the Wayland protocol.
Writing the Widget
To organize our code, we will create a StatusBar class that inherits from the appropriate Window class.
...class StatusBar(Window): def __init__(self, **kwargs): super().__init__( layer="top", # Ensure it stays above other apps anchor="left top right", # Anchors the bar at the top, stretching from left to right exclusivity="auto", # Reserves space for the bar so it behaves like a normal window **kwargs )Understanding the Arguments
Let’s take a closer look at the arguments used in the StatusBar class:
layer: Ensures that your bar stays visible above any regular applications (except when they are in fullscreen mode. use theoverlaylayer type place it on top of everything). for Hyprland users, to see a list of open layers, use thehyprctl layerscommand.anchor(Wayland only): Determines the bar’s position. For this guide, we want our bar to be at the top, extending from left to right, so we useleft top right.exclusivity(Wayland only): Ensures that the bar has its own dedicated space and is not overlapped by other windows or widgets.
...class StatusBar(Window): def __init__(self, **kwargs): super().__init__( layer="top", # Ensure it stays above other apps geometry="top", # Position it at the top of the screen type_hint="dock", # Inform the window manager that this is a dock-like window **kwargs )Understanding the Arguments
Let’s take a closer look at the arguments used in the StatusBar class:
layer: Ensures that your bar stays visible above any regular applications (except when they are in fullscreen mode. use theoverlaylayer type place it on top of everything).geometryandtype_hint(X11 only):geometry="top"places the bar at the top of the screen, whiletype_hint="dock"signals to the window manager that the bar should be treated as a dock.
Running the Bar
Now let’s see our creation in action!
...if __name__ == "__main__": bar = StatusBar() app = Application("bar", bar) app.run()The bar itself will not be visible yet (since it’s unstyled and empty (it’s height is equal to zero)), but you might notice that it has already reserved some space on your screen.
Adding Widgets to the Bar
Now, let’s add some content to our status bar (a DateTime widget for this example). To make positioning easier, we’ll use a CenterBox to manage the placement of elements within the bar.
...class StatusBar(Window):    def __init__(self, **kwargs):        super().__init__(            layer="top",            anchor="left top right",            exclusivity="auto",            **kwargs        )
self.date_time = DateTime() self.children = CenterBox(center_children=self.date_time) # Adds the CenterBox with date_time in the center of the bar...class StatusBar(Window): def __init__(self, **kwargs): super().__init__( layer="top", geometry="top", type_hint="dock", **kwargs )
self.date_time = DateTime() self.children = CenterBox(center_children=self.date_time) # Adds the CenterBox with date_time in the center of the barWith this setup, the date and time widget will be neatly centered within the bar using the CenterBox.
Final Code Example
Here’s the full code to create your simple status bar:
import fabricfrom fabric import Applicationfrom fabric.widgets.datetime import DateTimefrom fabric.widgets.centerbox import CenterBoxfrom fabric.widgets.wayland import WaylandWindow as Window
class StatusBar(Window):    def __init__(self, **kwargs):        super().__init__(            layer="top",            anchor="left top right",            exclusivity="auto",            **kwargs        )
        self.date_time = DateTime()        self.children = CenterBox(center_children=self.date_time)
if __name__ == "__main__":    bar = StatusBar()    app = Application("bar-example", bar)    app.run()
import fabricfrom fabric import Applicationfrom fabric.widgets.datetime import DateTimefrom fabric.widgets.centerbox import CenterBoxfrom fabric.widgets.x11 import X11Window as Window
class StatusBar(Window): def __init__(self, **kwargs): super().__init__( layer="top", geometry="top", type_hint="dock", **kwargs )
self.date_time = DateTime() self.children = CenterBox(center_children=self.date_time)
if __name__ == "__main__": bar = StatusBar() app = Application("bar-example", bar) app.run()Conclusion
Congratulations! 🎉 You’ve just created your first basic status bar using Fabric. After this tutorial you should end up with something that looks like this.

For a more advanced bar example, check out this example.